 If you are interested in growing cannabis indoors, you must realize that it is entirely different from growing the plant outdoors. Indoor cannabis farming poses more challenges compared to outdoor farming.
To grow healthy plants indoors, you must replicate the outdoor environment that the plants receive the right growing conditions are available. There is a myriad of steps that will guarantee success when growing indoors. Let us examine them.
Step1. Identify the Location
You can grow your plants in any indoor setting; providing you avail the necessary growth conditions to your plants. The growing space can be an abandoned room, garage, a cabinet, your closest, a tent or any other place you may choose. Space should be adequate to avoid overcrowding your plants.
Most people who farm cannabis indoors prefer using tents. With tents, you can assemble and disassemble them when you need to. When selecting the growing space, do not only think of the plants, but also consider the equipment that will get into the growing area.
If you are a beginner, it is advisable to start small. Starting small is the best method to avoid costly mistakes that will ruin your investment. The overhead costs will also be minimal. You will be able to take good care of the plants, compared to if you started with too many.
Step2. Identify and Select the Equipment Required
Just as I have highlighted before, growing cannabis indoors requires a set of equipment that will guarantee that you have replicated the outdoor environment suitable for optimal growth. You will need the following equipment
Grow lights
Since your room is dark and light from a single window will not be sufficient, you are required to install lights to act as the sun. Light is the most critical factor to consider when growing your plants indoors. It will affect your yields.
We cannot talk of ideal lights for your growing space. Several factors will influence your choice including the size of the area, power limitations, and your budget among others.
As the technology continues to improve we have access to a variety of lights. HID (High-intensity Discharge) lights are a favorite of many indoor growers. They are economical in both cost and electricity consumption.
Though they are not as efficient as the LED grow lights, you cannot compare their cost to the LED counterparts. They come in two forms; a) Metal Halide(MH) which produce blue-ish white light, they are mainly utilized in the vegetative stage and b) High Pressure Sodium (HPS) which emit orange-red light. They are used in the vegetative stage.
Fluorescent grow lights are another option. Small-scale growers prefer them because they are cheap and they don’t emit a lot of heat as the HID lights, therefore eliminating the need for a cooling system. Fluorescent lights are not as efficient as the HID lights, and you will require more lights per space compared to the HID’s.
LED (Light Emitting Diode) grow lights. They are considered to be the best indoor growing lights, but their cost is prohibitive. They emit less light, are durable and consume less electricity. If you chose to go for LED lights beware of poor quality LED lights in the market.
Liners/Tents
To produce seedless flowers, you must ensure that natural light doesn’t get access to your growing space. Only the use of tents or liners can guarantee this. They will ensure that your growing space is as reflective as possible, to maximize only the light inside the growing area.
Grow tents available in the market are made of Mylar, Canvas, white or black poly film. The films prevent insects and fungus from gaining access to your growing area.
Extraction Fans
These fans are essential equipment for indoor cannabis farming. They assist in regulating the temperatures and providing CO2 required by the plants for growth. If your growing area is completely sealed, you do not require an extraction fan; you will need a CO2 generator and A/C. These two are relatively expensive compared to an extraction fan.
Carbon Filters
When the cannabis plants are at the flowering stage, they emit a terpene-rich smell characteristic of marijuana plants. You definitely will not want your neighbors to know that you are farming indoors, thus the need of these carbon filters.
Grow Medium
Soil has been used for long to grow weed indoors. Pre- fertilizer organic soil is the best-growing media for beginners. It will offer the best results since you do not need to add any extra nutrients until you harvest your plants. You can also opt to use normal soil, but remember to supplements nutrients to the plants using a liquid fertilizer since ordinary soil has insufficient nutrients to enable your plants to grow healthy until maturation.
If you can’t use soil as the growth medium, then you have the option of using soil-less media, better known as hydroponics. It involves the supply of nutrients directly to the plant roots in the form of mineral salt concentrates. The roots absorb the nutrients via osmosis. Nutrient uptake is faster compared to when the plants are grown in soil.
Caution should be taken to prevent nutrient under-load or overload. Better yields are recovered from soil-less indoor farming. Different materials used as soil-less media include; vermiculite, Rockwool, coco coir, and perlite to name a few. Soil-less indoor farming can be done in automated hydroponic systems or hand-watered pots.
Pots/Beds
You will also require pots or bed in which your marijuana plants will grow. Your grow containers can be made of fabric, plastic, clay, planter beds or any other suitable material. Depending on the size of space available in your growing area, use the largest containers available to ensure your plants develop a healthy root system.
Clean Filtered Water
Finally, your cannabis plants require fresh water, free from contaminants available in city water like chlorine. You must invest in a quality water filter if you are using chlorinated water. Search online for the best brands; you can still rely on reviews from customers.
Step3. How to Grow Cannabis
Make sure you have the seeds to grow cannabis. There are numerous strains of this plant suitable for different ecological zones. Some may take longer to mature compared to others. Known the variety, you are growing from your vendor. Av excellent variety should be resistant to pests and diseases, molds, temperature and humidity fluctuations. Beginners should go for Sativa or Indica hybrid varieties that mature faster.
Once you have the seeds, develop a seedbed in the growing space. After a few days, the seeds will germinate. Pay keen attention to how the new plants respond to light in the growing area. If the light source is far away from the sprouted plants they will grow stretching to reach the light, in this case, you can adjust the light source to be nearer the plants. If the light source is near the plants, their rate of growth will be slow, in the same manner, adjust the distance of the light source to the plants to a reasonable level.
At four leaves stage, you can now transfer your cannabis plants to the containers you had already prepared. After some days, add some more growth media at the base of the seedling. This will assist in the development of a robust root system that is necessary for nutrient absorption.
In the initial days be keen no how you water the seedlings. They should never be waterlogged at any moment since this can result in root rot. When the seedlings have hardened, you can now increase the amount of water to the plants.
As the cannabis plants continue to grow, make sure the environment is under control.
Step 4. Pruning Your Cannabis plants
Pruning is one way of increasing yields in your plants. It will also help to minimize the risk of diseases and mold infestation. Pruning should start early enough while the plants are still young. This should be when you notice your plants are starting been bushy.
When pruning cut branches that are above the node in which two shoots will come out. This will work to increase the yields form the plants even if you have only a few plants. Pruning should be stopped 2-3 weeks before flowers set in, if you continue until flowering stage, you may elongate the vegetative stage which will impact on your yields.
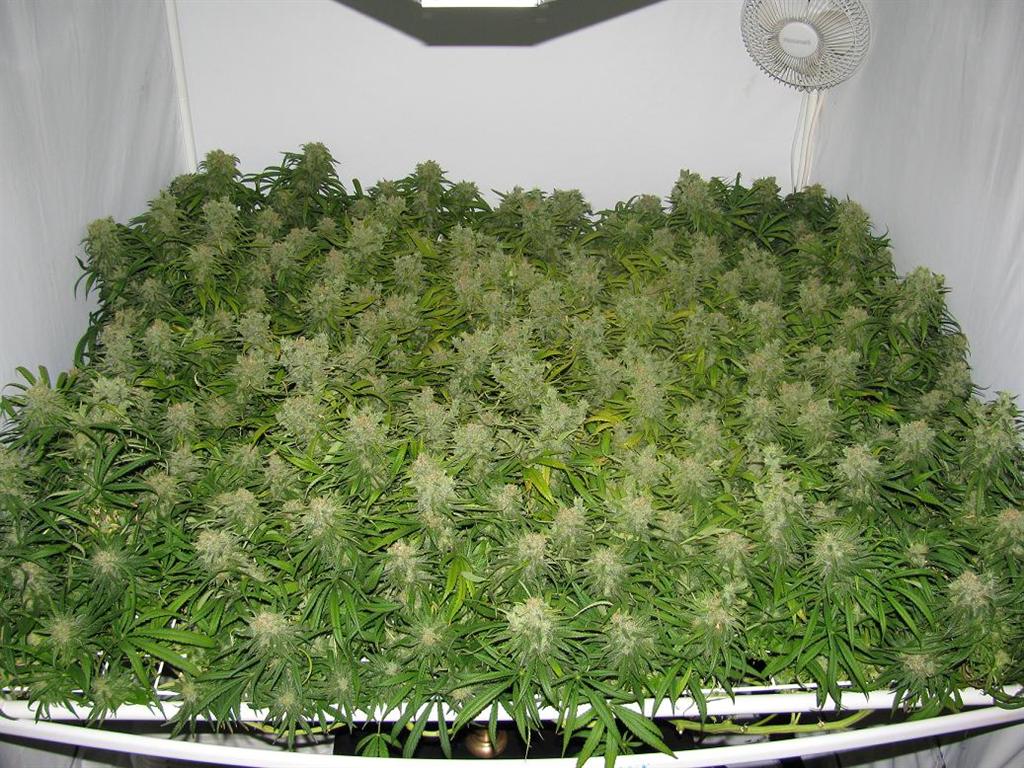
Step 5. Flowering Stage
During the vegetative stage, the cannabis plants grow just like weeds. Their stems and leaves increase in size. The flowering stage is different if you have raised the plants indoors. The flowering stage is sensitive, and if you are to get a good harvest, you must take excellent care of your plants.
By growing the plants indoors, you must induce flowering. It is done by alternating the light sessions, 12 hours of light and 12 hours of darkness every day. Autoflowering varieties do not require to be induced to flower. The vegetative stage takes 3 to 4 weeks, therefore after this period elapses its time to induce flowering. After inducing flowering, the first few weeks will record a rapid growth in height. Some people refer to this as “flowering stretch.” The plants can double in height in 1-3 weeks.
Note that it is only female cannabis plants that can develop buds. If you realize any male plants developing pollen sacs, remove it from the growing area. This will prevent pollination of female buds and the development of seeds in the buds.
After the “flowering stretch,” typically 1-3 weeks, budlets start to emerge at 3-4 weeks stage since induction of flowering. At this point, your plants are sensitive to nutrients and the environment, watch them carefully. You still have slightly over a month to go. If you observe the lower leaves turning yellow, you need not worry. This is a normal process of maturation.
Another critical observation should be “nutrient burn.” It is discoloration of the plant leaves due to excess nutrients. Underfeeding can also result in this condition.
In 6 to 8 weeks after flowering induction, the buds will ripen, while the pistil will darken. From this point, the plant’s energy is focused on the buds, way from vegetative growth. From week 8 onwards flowering ends and what you need to do is the “final flush.” It refers to feeding your plant on water only till harvesting
Step 6. Harvesting, Drying, Curing and Packing
When the harvesting time has come, the plant will show indications of nutrient deficiency. These signs will first appear on the lower leaves as they progress to the upper leaves. This indicates that the plant is utilizing nutrients stored in the leaves. Never harvest your marijuana plants when the leaves are still green. The drying & curing period will take longer than usual.
The harvesting season is the most exciting period for any farmer. You are now alive to the fact that your efforts have borne fruits.
Use a magnifying glass to observe the trichomes. The glad head turns cloudy white, then Amber. The best time to harvest is when a majority of them are amber.
After harvesting your weed, hang them to dry. The drying process should not be hastened. It will normally take a week for the cannabis to dry.
Once you establish that your buds have dried sufficiently, it is time to cure them in opaque containers. The curing process should take up to a month. During this time, open the lids twice a day to let excess moisture to leave the containers. When this time is over, your weed will have the perfect taste and should burn perfectly.
Final Words
Growing marijuana indoors can be tasking, but if you follow the necessary guidelines keenly, you will succeed in producing high-quality and tasty weed. I believe you have found this article useful. Whether you are a beginner indoor weed farmer or an expert, you need always to seek new ways and tips on how to better your indoor marijuana farming. All the best as you invest indoor weed growing.


